Okay, so I’ve been going to cons for a few years now and have done some simple cosplays (eg. Shadowhunter), but this year my boyfriend and I decided that we would put the effort in and do proper cosplays for LFCC (London Film and Comic Con). Naturally, I eventually decided on going as my favourite superhero, Nightwing, and he decided on going as Red Hood. It seemed perfect, after all, in addition to being my fav superhero, Nightwing looks pretty easy to cosplay. I did not take into account the fact that this was the first time I’d properly cosplayed. I soon realised that I had quite a few things to work out before the convention in July, and internet resources have been beyond invaluable in my prep so far.
So, I thought that I’d start detailing how I did things when putting together my costume, so I could be of help to anyone else stuck in my situation. I hope these will be especially helpful to those of you who are like me, just starting out, or are on a tight budget (I’m a student, I feel your pain!).
The first part of my cosplay that I completed was the mask, as it’s quite small and easy to make.
I adapted a method found on a brilliant cosplay site called Golden Lasso, and I’ve linked the original post here. I chose to use this method as it uses foam, which is a much cheaper alternative to the rubber etc that other masks will use.
You will need:
- 1x A4 sheet of black craft foam
- 1x polystyrene head (I know this sounds ridiculous, but it’s not, and it’s super cheap!)
- Some paper
- Some decent sticky tape
- 1x tube of Mod Podge (or a can of the spray)
- A paint brush (if using a tube of Mod Podge)
- A hairdryer
- A craft/stanley knife
Method:
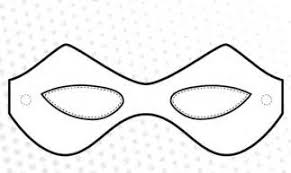
- Find a template online. I used the one below, first of all measuring the area of my face that I wanted the mask to take up and adjusting the image on Word as necessary. I then printed the template drew onto it the design I had in mind. I then cut out the paper template and tried it out for size. I was lucky that it was a decent fit the first time for me, but if it’s a bit off, this is the time that you need to use to adjust as necessary.
- Once that’s done, trace around the paper template on the foam, and cut out using sharp scissors or a craft knife. Be careful with this bit, you don’t want to start bleeding before you’ve even started fighting the bad guys!
- Now set the mask to the side for a bit and focus on the polystyrene head. Naturally when it comes, it’ll be a very generic and not-very-you-like shape. So, you need to pad it out to match your facial features. You can do this by papier maché, but I just used some paper and sellotape, layering it up until it roughly resembled me. It doesn’t have to be perfect of course, but I found that the best way of knowing what your facial features look like is to take a picture from a few different angles next to the head so you can get a fair idea. Here’s my version of this (I know, dark circles galore):


- Right, now the head is ready, tape the mask to it in the right places, making sure to secure it around the edges and in areas such as the eyes where the mask really needs to hug the face.

- Supporting the head at the base, press a hot hairdryer (I just used mine from home at the highest setting) to the mask and the surrounding areas. This will mold the mask to the shape. You may find at this point that some of the features of the head (such as the eyes) may start to disintegrate due to the heat – don’t panic, it’s not that important!

- Once you are are happy with the conformity of the mask leave it to cool, then apply the first coat of Mod Podge. I’d leave roughly 24 hours between each coat after that, and apply as many as you need to in order to get the finish that you’re looking for. I think that I used about three or four coats, but I’d probably recommend three as mine was a little bit too shiny for me in the end. Also, if you’re using the Mod Podge in a tube, make sure to apply thin coats otherwise it’ll take longer to dry and there might be brush marks on your finished item. Don’t worry if it looks like you’ve just spread PVA all over your mask, that’s fine, it’ll dry clear!
 Layer like this…
 …rather than this
 - Once you’re happy with the finish on your mask, you can un-peel it (carefully!) from the polystyrene head.


- Voila, your mask is complete!

I do have better pictures, I swear, but those are spoilers for posts to come…
A quick note on wearing the mask:
1) I’d recommend using black face paint to wear under the mask if you’re not using white eyes (I couldn’t be bothered) ’cause it looks kinda weird if there’s just bare skin underneath.
2) I used Mehron spirit gum to attach my mask to my face at the convention, and it worked really well, staying on all day despite the heat at the venue. I would recommend getting a pack with the remover included though, as even though it’s a bit more expensive (the both of them come to around £15), it makes getting the mask off so much easier. Also, be careful when taking the mask off and do it slowly as when I tried to pull it off too fast and without any remover, I almost pulled my eyebrow off (something that would probably horrify the real Nightwing…).
So that’s it, you’re making progress on your cosplay! You might need a weapon though…
Until next time,
Bex out!

Pingback: The Cosplay Zone: Rapunzel Cosplay (Part 1 – Ideas and Planning) | A Linguist's Ramblings